
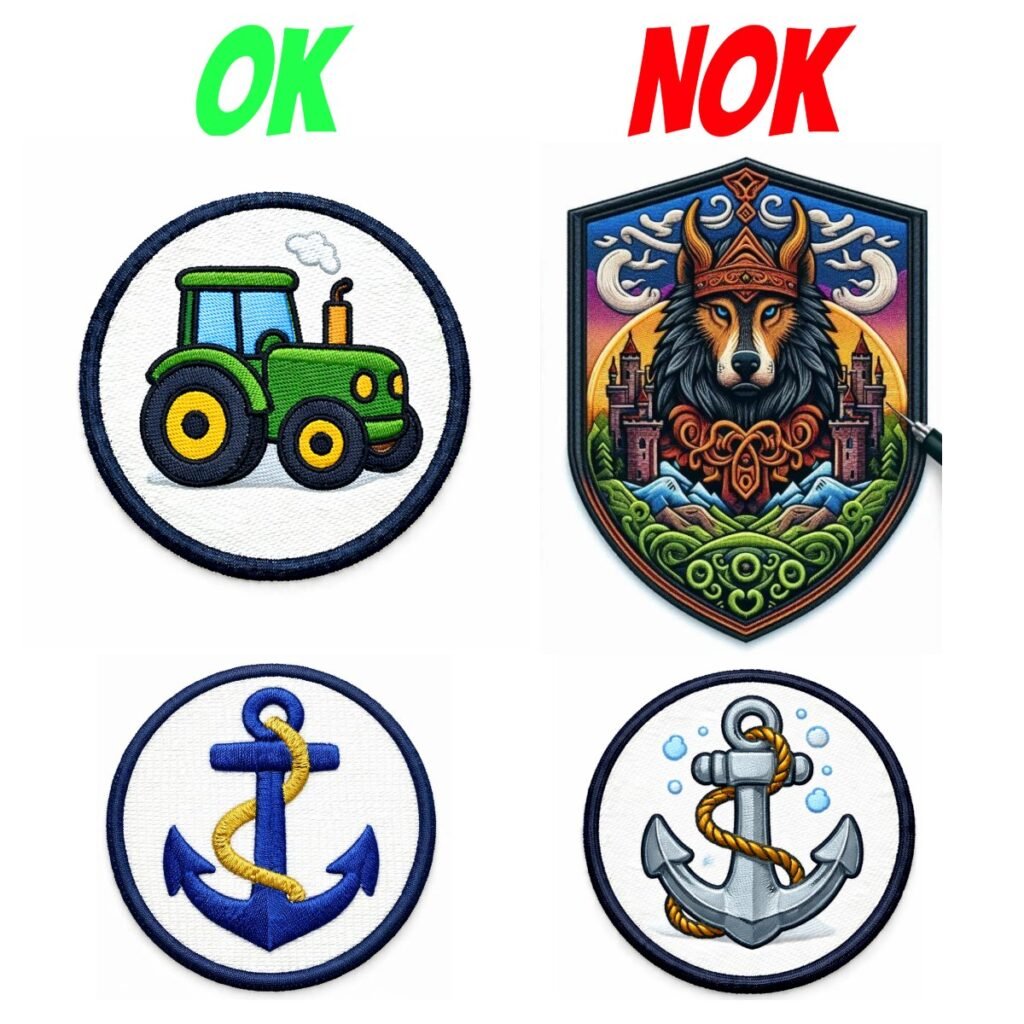
How to make with AI a patch design that can actually be embroidered, not just a pretty picture?
If you’ve tried designing a patch using ai image generator, you’ve probably encountered a problem: the image looks beautiful, but the embroidery manufacturer refuses to process it. This is normal – most AI images are created as illustrations, not as designs for machine embroidery. This results in gradients, shadows, highlights, and many small details that cannot be reproduced with thread on an embroidery machine. To achieve a predictable result, it’s important to generate not just a “picture,” but a realistic mockup of the embroidered patch that looks like the real thing:
stitches, embroidery density, thread direction, a proper border, and neat fills are visible.
Using specialized prompts for AI patch concept generation
Our prompts create a realistic embroidery mockup: satin and overcast stitches, a limited palette, clean outlines, and a precise border. Suitable for logos, characters, animals, skulls, portraits, and any other ideas. A minimum of surprises—maximum production results.
Why standard prompts aren’t suitable for creating patches
A simple request like “make a dog patch” often results in a low-tech result. Neural networks automatically add effects that look beautiful on the screen but aren’t suitable for embroidery:
gradient transitions
highlights and volume
micro-textures
too thin lines
too many colors and shades
Embroidery works differently: each color is a separate thread and a separate machine pass.
The more colors, the more expensive and complex the production, and small elements often turn into “mess.” Therefore, professional patch design is always based on simple shapes, a limited palette, and a neat outline.
How to create a patch design that can actually be embroidered
In order for an image to be transferred to an embroidery machine program,
the design must be adapted to the technology. To achieve this, the Prompt should require:
- A simplified color scheme
- Flat fills without gradients
- A clear, legible silhouette
- Outline and line details
- Realistic stitch imitation (satin, satin, fill)
- Overlock/merrowed border
- Correct text handling so that the letters embroider properly
Only then will the image resemble real embroidery and be accepted by the technologist or manufacturer.
Limited palette: how many colors to use
In most tasks, 3–7 colors are optimal. This is enough to convey the form and idea without overloading the design with unnecessary shades.
Too many colors increases the cost and the risk of defects, while too few colors make the image less recognizable. Therefore, a good Prompt should force the model to select the minimum number of colors necessary for a legible result.
Text on a Patch: The Important Rule
Many people want to add a name, slogan, lettering to a patch. This is possible, but there’s a simple rule:
The height of the letters on the finished patch must be at least 7 mm.
If the letters are smaller, they often don’t embroider properly: the pieces “stick together,” the outline breaks, and the text becomes illegible. Therefore, a proper prompt either embroiders large text in satin stitch or removes it if it’s physically impossible.
Patch Shapes: Circle, Oval, Square, or Contour
Real patches aren’t limited to round shapes. Depending on the task, you can create:
Round patch
Oval
Square or rectangular
Contour patch (die-cut / cut-to-shape)
It’s important that the “finished shape of the product” is visible in the generation, not just a drawing on a white background. Then the result looks professional and closer to the real product.
What can you create with Mottopatch Patch Prompt?
This universal Prompt is suitable for many situations. You can use it to generate:
Animal patches (dogs, cats, birds)
Logos for brands and workshops
Biker and motorcycle patches
Skeletons, skulls, horror-themed patches
Characters, mascots, emblems
Patches for clothing, backpacks, and uniforms
Thematic series (marine, fruit, professions, transportation)
The main thing is to properly adapt the image for embroidery: remove unnecessary elements, limit colors, and enhance the silhouette.
Why realistic ai patch generation saves money and time
When a design looks like “real embroidery,” it’s easier for the manufacturer to evaluate it, and the likelihood of rejection is significantly reduced. This approach provides:
fewer edits and rework
a clear result before launching into production
the ability to quickly assemble a series of designs
savings on manual finishing by a technologist
Result
A beautiful AI image ≠ a design that can be embroidered.
But if you use the right Prompt, taking the technology into account, you can get a realistic embroidered patch that looks natural, is legible at a small size, and is suitable for production.
If you want to get predictable designs and make patches without manufacturer rejections, use a prompt that “thinks like an embroidery machine,” not like an artist. Check our prompts by Mottopatch.
FAQ Custom Patches Embroidery
Because a neural network typically adds gradients, shadows, highlights, and small details that cannot be replicated with thread. Embroidery requires simplified shapes, a limited palette, and clear contours—otherwise, the result will be unpredictable both time- and cost-wise.
You don’t need to generate a “picture,” but a realistic embroidered patch: with visible stitch texture satin, dense fill, a border, and a limited number of colors. This design is easier to transfer to an embroidery machine program and send to production.
Typically, 3–7 colors are optimal for standard patches of 7-9 cm. This allows to maintain the image’s recognizability without overloading the embroidery with unnecessary shades. The more colors, the higher the price and the risk of defects, so it’s best to use a minimal palette.
Yes, but it’s important to follow this rule: the letter height must be at least 7 mm on the finished product. If the text is too small, it may not embroider properly and will become unstitchable. It’s best to use satin embroidery and short words.
Yes. Our universal prompts are suitable for any theme: logos, pets, flowers, skulls, emblems, etc. The main thing is that the prompt should translate the original idea into the embroidered pattern: remove halftones, reduce details, limit colors, and maintain a legible silhouette.
A printed image is simply an image on a surface printed with ink. A patch is the final product of a stitching with thread process: first, an embroidery program is created, then the embroidery program is tested by stitching samples and adjusted, after which the product is embroidered and cut out, the edge is finished, and post-processing is carried out (removing extra threads and quality control). Therefore, a “print” and a “embroidered patch” are two different worlds.
Because a patch isn’t a single “print” step. It goes through several stages:
Preparing the embroidery program
Selecting threads and colors
Setting up the embroidery machine
Embroidery (sometimes 10,000-15,000 stitches even on a small size)
Cutting to shape
Finishing the edge
Quality control and manual post-processing
This is physical production, not just a picture print with all the respect to printing services (we also do them).
Because an embroidery machine can’t embroider from a picture. This is essentially a machine that requires a program: where each stitch goes, in what order, at what density, how to create the outline, how to work around difficult areas, how to change the thread.
The program takes into account:
fabric/base type
base reinforcement
stitch type (satin/overcast, etc.)
thread tension
stitch density and direction
Automatically transferring an image “to the program” almost always produces poor and unpredictable results, so good artisans prepare the image manually or adjusting independently using professional software.
Even a small custom patch takes time:
Program preparation: 15 – 90 minutes
Fabric preparation + embroidery: 7 – 40 minutes per 1 patch
Cutting and post-processing: 3 – 7 minutes
For example, a 70 mm patch with a dense design often contains 7,000–15,000 stitches and takes approximately 5 – 15 minutes to sew, with the entire cycle taking approximately 25 minutes
Patches don’t just “come out of the machine ready-made.” After embroidering, they are:
cut from a large base sheet (by hand or laser)
edge-finishing (overlock/merrow or laser)
quality-checked
post-processing (removing small protruding threads that appear when changing colors)
That’s why a neat shape and clean edge are a separate part of the work.
On marketplaces, the platform takes a portion of the price (commissions, advertising, logistics). Because of this, manufacturers are often forced to save:
on embroidery density
on setup time
on material quality
on packaging and quality control
When ordering directly from the manufacturer, you usually receive:
a personalized approach
consistent quality tailored to your needs
proper consultation
a fair price without unnecessary fees
And we can communicate freely.)
Because the quality of the result depends not only on the image but also on the technology of execution. Two different manufacturers can differ greatly in:
experience in digitizing
machine quality and setup
stitch density and type settings
thread and fabric quality
embroidery speed (too fast = sometimes lower quality)
edge finishing accuracy
level of control and post-processing
One artist will create a clean and reliable embroidery, while another will do it “as it turns out.” Therefore, even the same design can look different.
In most cases, no, it’s not 1:1.
Embroidery doesn’t reproduce a photograph as well as a print. It works through:
Flat color zones
Outline
Limited palette
Stitches that create this special texture many people like, but not “photographic light”
Photorealism in embroidery is only partially possible and usually requires:
Large size
A large number of colors
Complex program preparation
Expensive production
Therefore, the best approach for patches is a simplified embroidered version that remains recognizable and looks clean.
Because embroidery has physical limitations: thread has a thickness, stitches have a density and length (pitch), and fabric can have some stretching and vary in fiber thickness.
When an element is too small, it:
clumps together
loses shape
becomes a hole
can “float” due to tension and density.
Therefore, text and small details need to be made larger and simpler. Rule of thumb: letter height should be at least 7 mm, otherwise
the manufacturer is likely to either refuse the product or make the result unpredictable.
Staff picks
Products by Tag
-

Germany Flag Football Patch with Custom Text Embroidered
Price range: 9.95 € through 16.89 €